Stories of life on our farm in Northwest Georgia where every day is an adventure in this beautiful spot that God has entrusted to our stewardship.
Showing posts with label Pork. Show all posts

Thursday, January 8, 2015

The Freshest Sausage Ever!

 This is dedicated to all the meat-eaters out there who think it's horrible to butcher an animal we knew.

Fresh Sausage

Even thought it's got English subtitles (I think it's in Portuguese), be sure to turn up the volume.

Saturday, September 28, 2013

Quick and Easy, Fool-Proof Chili

Company coming . . . what to fix?  Try my favorite cool-weather recipe:  Wick Fowler's 2 Alarm Chili turned into No-Alarm Chili for tender taste buds.  It only takes half an hour to make.  In fact, it will probably take you longer to read this post than it will to make the chili!  But read the post, anyway!  The way I make it, it pretty well fills up a 6-qt. crock pot and will feed 8-12 people, depending on their greediness!

Here's the package back showing ingredients and directions.  I change it up a bit, of course--I'm allergic to following any recipe!

For my version:

Break up 2-3 lbs. of ground grass-fed beef and pastured pork into pecan-sized bits and brown on medium-low heat.  The more meat you use, the milder-flavored your chili will be.

Use 1 28-oz. can of crushed tomatoes.  I like Cento brand best because they're thick, not runny.  You can opt to use tomato puree for less texture or you can crush canned whole tomatoes with your hands, but it's more work and the chili won't be as rich and tomato-y.

Instead of water (that's for ducks!) use 1 bottle (forget cans!) of good beer.  Negra Modelo or Dos Equis are good.  This time I used Guinness Stout.  
Very Important:  Taste the beer first to be sure it's good!  You do not want to ruin your chili with bad beer!  :)


Follow the Mild Chili directions.  More in a minute.

Stretch your chili with canned beans.  I usually add about 1 15.oz. can per pound of meat.   My favorite is dark red kidney beans, but I also use black beans, pinto beans, or light red kidney beans as the mood strikes.  Adding beans makes the chili perfect for "Make Your Own Taco Salad" or "Mexican Pile-Up."

Since this recipe is as easy as browning meat and opening cans, I didn't insult your intelligence by posting photos of that process.  I'll just give a quick run-down of the steps:


  1. Brown the meat in a skillet over medium-low heat.
  2. While periodically stirring the meat (too much manipulation or too-high heat can make it tough), I heat the crock pot on high.
  3. Drain and rinse the beans in a colander, then dump them into the crock pot.
  4. Add the tomatoes on top of the beans.
  5. Use the beer to rinse out the tomato can and pour the entire bottle (minus your taste test; don't worry--the chili is going to simmer and kill any germs the beer didn't kill) into the crock pot.
  6. Drain the browned meat in the same colander.  You can put a bowl of your dog's food under the crock pot, and he will thank you at supper time!
  7. Add the browned meat to the mixture in the crock pot and stir well.

In case you were wondering what the sign behind the crock pot says, here it is!

Now comes the fun part!  Open the Wick Fowler's 2 Alarm Chili Kit box and take out the goodies inside.  Separate them into three piles:


  1. Chili powder, salt, cumin/oregano, onion/garlic and paprika in front.
  2. Masa in the middle.
  3. Red pepper in back.
Now put the red pepper packet back into the box.  Save the box for the directions.  When you're done you will toss the box with the hot pepper inside!  This will ensure that you won't accidentally put the hot cayenne pepper into the chili, making it inedible.  Trust me, it will have plenty of flavor and a bit of heat without the cayenne!

Here's a look at the spices you're going to use right now in assembling your chili.  Note:  You could stock chili powder, cumin, oregano, onion flakes, garlic flakes and paprika.  You could try to figure out the right proportions.  Then you could open 6 jars, measure all the spices into your chili, close the jars and put them away.  Or you could just be smart and pick up a package of Wick Fowler's 2 Alarm Chili Kit at the grocery store.  You decide!

Grab a scissors, cut open the packets and dump them onto the chili.  It's that easy, and you're almost done.

Stir the chili and keep the crock pot on "High" until it simmers.

After the chili simmers, take 1/4 c. of warm water, dissolve the masa into it, then stir it into the chili.  You can then turn the crock pot to "Low" and leave it.  Contrary to what the directions say about simmering 15 minutes, there will be enough heat left in the crock pot to thicken the masa mixture.  This saves you from having to remember to come back and turn the crock pot down later, and it ensures your chili won't have a burned taste if you forget.

Now you just have to wait till supper time!  While you're waiting, briskly scratch this photo on your computer screen with your thumbnail to enjoy the odor of simmering chili.

We like to serve the chili on top of corn chips and top it with:

  • Grated sharp cheddar cheese
  • Chopped sweet bell peppers
  • Chopped tomatoes or cherry tomatoes
  • Lettuce
  • Sour cream
  • Salsa
  • Guacamole
We call this "Make Your Own Taco Salad," but I like our friends' name better:  "Mexican Pile-Up."

Be sure to have plenty of cold beer to serve with the chili.  Your guests will probably prefer if you don't taste test those bottles!

This recipe is so easy and the result is so delicious, it's almost a crime not to invite someone over for dinner!  If you're lucky and your guests aren't too greedy, you'll probably have enough leftovers for supper tomorrow.

Bon appetit!

Saturday, January 12, 2013

The Cost of Raising a Pig: How Much Does Our Pork Cost Us?

I've finally done the calculations on how much it cost us to raise this year's pig from the day we fetched her from Jim Gifford's farm to the day we packed the pork into our freezer.


We brought Spamela Anderson and her sister, Hammy Faye Bakker, home on June 3.  Jim estimated that they weighed 100 lbs, and said they were a bargain at $80 each.  (Since we knew we'd be butchering a steer and didn't have room in our freezers for two pigs, but felt it would be cruel to raise one pig alone, some friends bought Hammy Faye and reimbursed us for her food.  They got a pig at cost without paying for our labor while we got to have a pig.)


By Sept. 14, the pigs were each eating 1 lb. of chicken crumble twice a day.  They ate a total of 950 lbs. of feed between June 3 and Nov. 13, for a cost of $278.03.  They also got copious scraps from house and garden (mostly vegetables).  For the last six weeks or so, they got a pound or more of acorns a day.


On Nov. 3 at approximately 35 weeks of age, we checked their string weights.  Spamela weighed about 301 lbs. while Hammy Faye weighed 319 lbs.   To determine how to divide the feed costs, we calculated the pigs' weights as percentages.  Spamela was 48.55% and Hammy Faye, 51.45%.  So our share of the feed cost was $134.98 (48.55% of $278.03).


The pigs were butchered on Nov. 13.  The butcher guessed their weights as:
Spamela - 378.81 lbs.
Hammy Faye - 391.18 lbs.
(Clearly, our string weights under-estimated their actual weight.)

Their hanging weights were 190 lbs and 198 lbs., respectively.

Our pig's butchering and processing fee, based on her weight, was $158.50.  This included the cost of curing and smoking the bacon (over 20 lbs.) and hams (over 40 lbs.).  We came home with 151.02 lbs of pork, including about 3 lbs. of fat, but excluding the weight of bones.


Here's the final break-down:


Production Cost for Our Pig
Purchase of 1 pig                                                      $  80.
48.55% of feed cost                                                  $134.98
Butchering Fee for our pig                                       $158.50
Total Production Cost for our pig                    $373.48

That's a Net Price of $2.47 per pound.  

We're thrilled with that price for delicious pasture-raised, acorn-finished pork.  And that doesn't begin to calculate the enjoyment we got from raising Spamela and Hammy Faye! 

Wednesday, November 14, 2012

What's in Fashion This Fall

Frosty mornings

Mid-morning naps

South Pork Ranch T-shirts!

To my delight, I won these great shirts by being the first one to correctly guess the identity of a secret contraption featured on the "Midlife Farmwife" blog.  I met Donna O'Shaugnessy when she made a very apropos and very funny comment on a blog we both follow, which she very kindly allowed me to reblog as "The Poop-ular Chicken."  I'm definitely wearing my shirt next time I go visit my sister in Allen, Texas--right next door to South Fork Ranch in Plano!

Saturday, December 24, 2011

Praise the Lard and Pass the Biscuits!

Right before we took the pigs to the butcher, I read a newspaper article about lard which turned around my thinking on this much-maligned kitchen staple.  The internet is a great source to learn about the benefits of lard and the fact that pasture raised pigs make the healthiest lard.  I realized that our pastured pigs would give us lard that was FAR healthier for baking than highly processed commercial lard, shortening, or even butter.  No more need to use olive oil in my biscuits in an attempt to make them healthy!

Here's how we turned 9 lbs. 5 oz. of fat scraps into some heavenly lard:

Teamwork made short work of a big job, separating the fat from the meat scraps.

We got 6 lbs. 11 oz. of fat pieces . . .

 . . . and 2 lbs. 10 oz. of pork scraps to put in the freezer.

We heated the fat in a heavy stainless pot over low heat for several hours, stirring occasionally.

It worked!  The fat scraps melt into lard, leaving cracklings behind.

Ready, aim, pour!  A wide-mouth funnel holds a strainer lined with a coffee filter, ready to ladle the hot lard into sterilized pint jars.

This strains out any fibrous bits . . .

. . . leaving pure, clear lard.

As it cooled, the lard began to turn from clear yellow to cloudy yellow.

The nice, crisp cracklings cooled in a colander before we froze them.

In the morning, five pints of snowy white lard greeted us.  Four went into the freezer while Jenny immediately dug into the fifth jar to make some amazing biscuits!

When it comes to lard, I'm a believer!

Saturday, December 17, 2011

Smoking Hot Bacon on a Freezing Cold Morning

Dec. 1 was a snappy cold morning with a heavy frost on the ground, and we got up before the sun came up.

Jenny went out to feed the animals in the barnyard while I got dog food ready in the house.

As soon as we'd fed the dogs and ourselves, we got to work on the bacon.  The first step was to rinse it, removing all of the curing salt.

Each plastic container that had held two slabs of bacon yielded about a half cup of liquid this time.  I had drained the bacon once before, but got only a little liquid.  This is liquid that was pulled out of the meat by the curing process.

There was less liquid to drain out of the bacon that had been cured in Ziploc bags, but that was because some leaked out onto the bottom of the fridge.  I personally found the Ziploc method not worth repeating.  The salt that rubbed against the "zippers" when putting the bacon into the bags made it impossible to close the bags tightly.  For the small investment, I much preferred the large rectangular plastic containers with lids.  I can easily stack and store them till they're needed next time.

Next we patted the slabs of bacon dry with paper towels and stacked them up to await their turn in the smoker.

We made foil packets of wood chips and poked holes in the top with a fork, laying them directly on the heating coil of the smoker.  We smoked two batches with applewood chips and two with hickory.

Once the smoke was evident, we put the bacon on the racks and closed the lid.

Then we set the timer for 45 minutes and waited . . .  Tai was very interested (and hopeful) about the whole project.

What a marvelous smell wafted forth!  We were feeling very interested and hopeful, too!

After we took the bacon out, I discovered that the electric coil was burning right through the foil which was then sticking to the coil.  I learned several things:
1)  Even when you think the packet of coals has cooled off, do NOT drop it into a plastic can lined with a plastic garbage bag!
2)  If the hot coals melt through the plastic bag and garbage can, do NOT dump them out inside the house!  Especially if your aim is bad and some misses the sink and ends up on the throw rug.

3)  Do NOT dump burning coals off a throw rug onto the vinyl floor!  It is much easier to replace a throw rug than to live with coal holes in the floor!

I also learned that chips placed directly on the coil make very good smoke because they catch on fire.  The bacon will still get smoked, but the fire isn't good for the paint on the smoker.

We have since purchased a stainless steel smoker box to hold chips when smoking for a short time, and we have switched to chunks of wood when smoking for a longer time (like for a ham).

I also learned that despite making a few silly mistakes, smoking turns out some beautiful-looking bacon!  Did you know that store-bought "Hickory Smoked Bacon" has probably never been near a wood chip, much less a smoking one?  An article from the University of Wisconsin-Madison magazine describes their bacon-curing class:  "The class observes how to add flavor using an injector machine, a method that replicates the results of older and much slower practices of dry curing. The pork belly moves along a conveyor belt beneath a row of pumping needles connected to hoses that deliver water and a foamy mixture containing the liquid smoke. While the smoky smell is almost overpowering, there’s no smoke anywhere."

Yum!  Just think about it--when did you last see bacon that looks like this in a grocery store?  I assure you, smoking involves heat which partially cooks the bacon, so if your bacon is pink and raw-looking, it has more likely been poked than smoked!

Once the bacon was cooled, I packaged it with our Vacmaster Pro.  I love using the bags with a ziploc on one end because that way you can remove the bacon, slice some off and return it to the fridge.

After marking the packages with weight, wood flavor and date, we put them into the freezer.

Except, of course, for one slab that we couldn't wait to try for breakfast the next morning!

Thursday, December 8, 2011

Hog Heaven

Monday, Nov. 21, after I took Kara to classes up at Covenant College, I went to Triple H Meats to pick up the pork from 4 and 8.  Jeff helped me load the boxes in the car.  He had called me earlier to tell me they were "the nicest pigs that have ever come through here."

I asked what he meant by "nicest," and he said that they were very nice pigs personality-wise, but he was talking about the meat.  He said the meat has a nice red color to it and that the fat had a lovely, tender texture and made wonderful sausage.  "I don't know what you did to them," he added, "but that is some beautiful pork."  I told him a lot of credit belongs to Herb who was out in the yard picking up acorns for their last three weeks after I read that the best ham in the world comes from Spain where they finish the hogs on acorns.  For the rest, we just kept them on pasture and supplemented with laying crumble for chickens because that was the only pork-free feed we could find.

Jeff asked what kind of pigs they were, and when I told him Berkshire crosses, he said that explains the nice red color.   He wanted Jim's contact information, saying he might get a couple of pigs for himself.

Driving home with 243.5 pounds of pork, I felt mixed emotions.  I was sad for 4 and 8.  I still look out the back door and miss their ear-perky trot coming to see who's there.  At the same time, I felt content on their behalf, that they had fulfilled so well their created purpose and that they had so obviously enjoyed their lives.  I felt thankful to God that a search for a used hay feeder on Craigslist had led me to such an excellent pig breeder who just happened to have a couple of gilts left.  That wasn't serendipity--that was a gift from God.  And finally I felt a deep sense of satisfaction that Herb and I, complete novices when it comes to pigs, had managed to care for 4 and 8 for six months in such a way that we turned out the best pork that our butcher has ever seen.

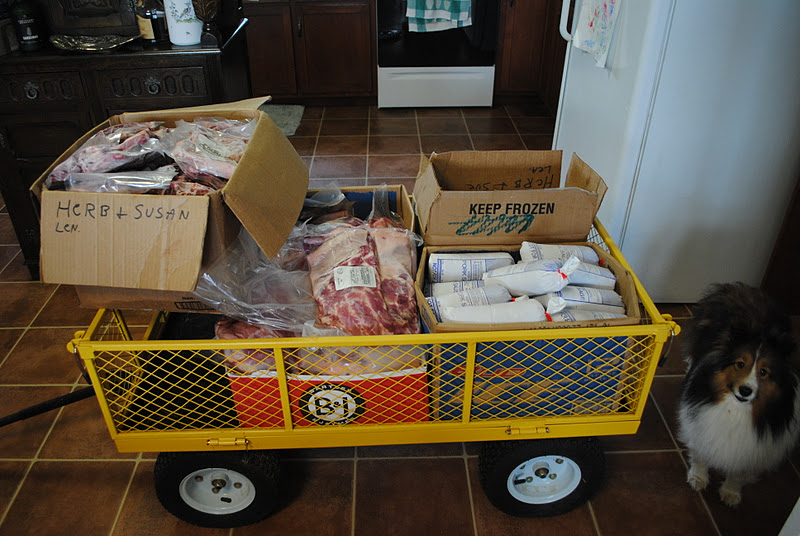
When I got home, I put 65 pounds of fresh bacon and ham in the fridge, ready to begin curing, along with 9 pounds of fat scraps to render into lard.  I hauled the grandkids' wagon full of frozen meat out to the freezer in the hay barn where I stowed away 70 pounds of sausage; 80 pounds of ribs, chops and roasts; and 20 pounds of hocks and soup bones.

And I smiled sadly to myself at the thought that the piggies had gone home to hog heaven.  How did I know they were in heaven, besides the fact that they were such good pigs?  Well, the place they had gone was freezing cold--definitely not hot!

Tuesday, December 6, 2011

Curing Bacon at Home

Over a year ago I had bought some pork belly at Nature's Harmony Farm.  Unsure what to do with it, I kept it in the freezer all this time.  Recently I had the motivation to figure out how to cure it, with our own pork ready to be brought home in a few days.  So I researched recipes online and used them as a basis to create my own homemade bacon cure.

The ingredients:
1/2 c. kosher salt
1 1/2 cloves of fresh garlic, crushed
2 small sprigs of fresh rosemary
1 sprig of fresh thyme, crumbled to remove leaves
1 bay leaf
10 juniper berries
fresh ground pepper

I hand ground the garlic and herbs with a mortar and pestle, then blended them with the salt.

Some recipes use glass or plastic containers; others use ziploc bags.  I chose the container method for my bacon.  I cut a new plastic sink liner in pieces and used a piece to raise the bacon up out of any liquid that would drain out during the curing process.

Next I rubbed the curing salt all over the pork belly and into any crevices, then closed the container and put it in the fridge.

Two days later I drained off the small amount of fluid that had collected in the bottom of the container and reapplied the curing salt.

After five days I could see that no more liquid was draining out, and the bacon was quite a bit firmer than it had been at first.  The final step was to thoroughly rinse the bacon, pat it dry, and smoke it for 2 hours with hickory chips.

A few days later when Herb came home for Thanksgiving, he cooked the bacon for breakfast.

We learned a few things from this experiment:
(1) The ideal time for curing the bacon is 3 to 5 days;
(2) one hour is long enough to smoke it, and
(3) it was truly delicious, and we can't wait to taste our own bacon!